(This blog post was originally published January 11, 2011 and April 19, 2011 on my first blog site, which is no longer in existence.)
In this repub I will be combining blog posts, keeping the really essential bits about Woven Shibori and flushing the bits that no one wants to read about ;-).
Part the first:
I had plans for a new Woven Shibori wide scarf project. I researched patterns on handweaving.net and found an undulating twill pattern for 8 harnesses that I liked and played around with it on pixeloom. I got a warp wound and halfway threaded. I was going to finally get back to it and then the holidays and my holiday knitting kind of got in the way of any serious weaving.
But I thought I would share my draft. I am actually using the sequence on the left which starts with two repeats of a straight draw, then a zigzag in the middle, then two repeats of a straight draw.
This is the drawdown. What I had in mind was an ogee motif repeated across the scarf. See this article on Ogees for more on that subject.

Part the second:
[After the holidays] my woven shibori project moved slowly but it did progress. I got the first scarf off the loom and tied up all of the shibori threads. I had decided to paint the scarf with one color (rust) on one side, wait a bit, and then flip it over and paint the scarf with a different color on the other side. I did this in my dungeon (basement) dye studio. The scarf was just the right length to stretch out on the “table” that I use to paint yarn.
So first I soaked the scarf in my tub of water and soda ash.

Then I stretched it out on my dyeing “table” and painted it with the rust color dye.

As you can see, my “table” is a piece of plywood placed on a non-functioning laundry sink. Not very glamorous, but it is a space that suits my needs and as an added bonus, nobody else in the family would ever consider wanting to use it.
So I have that scarf dried and the ties pulled out. It’s very interesting to note that the dye didn’t really penetrate to the other side very much, with either color. So the scarf is kind of reversible, colorwise.
I have finished weaving the second scarf, with a slightly different tie-up, with longer floats. I am in the process of dyeing it, and there will be two steps. The first was to paint it all over with aquamarine dye, which makes the light yellow a pretty aqua-green. Then I will dip-dye the scarf in a tub with a good medium blue.
To be continued….
Part the third:
When I last blogged about my latest woven shibori project, I had just dyed the first scarf in a two-scarf warp by painting it, front and back, one side with rust orange and the other side with brown. That scarf turned out ok, but I didn’t like the pattern. The undulating twill was way too elongated, and it was kind of broken up. The lines weren’t smooth enough for my sensitive eye.
So my next move was to alter the tie-up for the second scarf. I made the floats much longer with the hope that the pattern would be more clearly defined. I also changed the treadling so that each pattern shot was done twice (last time I did each pattern shot three times). Here is the latest weaving draft which reflects all these changes:

So I wove the scarf (a process that took quite a while, as I was doing a bit of knitting as well). I pulled up the shibori pattern threads and tied them. Then the dyeing began. I decided to do two colors. The base color of the scarf is a light yellow, so the dye colors had to be able to go well with that color. I chose aquamarine for the first color. And I put the soda-soaked wet scarf in a plastic tub and basically poured a half liter of dye solution all over it. I squeezed it and turned it over and over, making sure that the scarf was completely covered by the aquamarine. Then I covered the tub and left it for about a day. I went through the rinsing out, and hung it up to dry.
No rush.
My next move was to mix up some bright blue dye, enough for the weight of the scarf and filled a tub with about three inches of dye solution. I soda-soaked the scarf again, and then draped it over a couple of lucite dowels so that just the ends of the scarf were dipped into the dye solution. I left this for a few hours, maybe overnight, memory fades….
Anyway. I rinsed it out, and then I went away for about a week and a half, and I couldn’t see the finished product until I got back home. The suspense!
So, here are some pics. This is the scarf, with the ties still in:

And here is the scarf modeled by the lovely Stella:

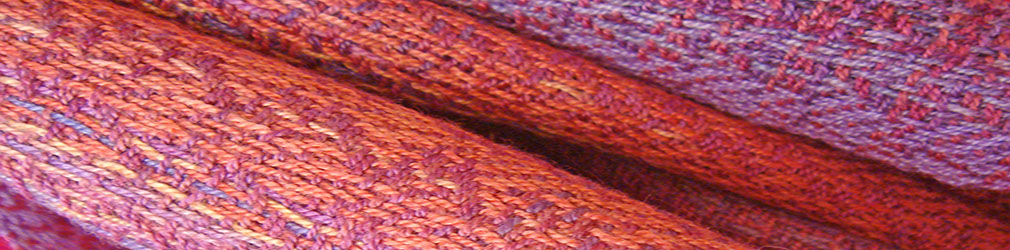
And here are a couple more pics, purely for eye candy: