This is a shout out to Katzy Luhring for referencing my blog and work in Turned Taqueté in her resources for her Summer Day Bag project in the latest Handwoven Magazine, Summer 2026.
Check it out!
This is a shout out to Katzy Luhring for referencing my blog and work in Turned Taqueté in her resources for her Summer Day Bag project in the latest Handwoven Magazine, Summer 2026.
Check it out!

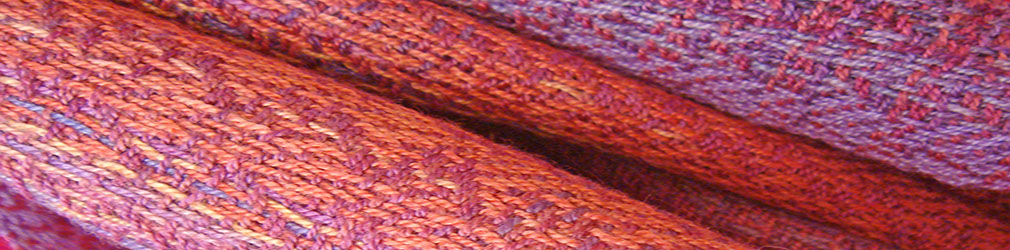
This is a scarf fresh off the loom, again in a form of Deflected Doubleweave. I used a draft from Weaver’s Magazine Issue 44 Summer 1999, in a article by Ruth Morrison. The photograph in the article shows a close nubbly texture that reminded me of shards of glass. Then I thought that this design would work well with a gold background and jewel-like pattern threads that would look like glass. Somewhat Byzantine?
Here it is on the loom:

Here’s another view up close:

It’s woven in 8/2 rayon, sett at 20 epi. The selvedges in Deflected Doubleweave are a continuing issue which I solved this time by cutting each color and weaving in the ends as I went. It slow me up some, but, Hey, I’m retired, so……..

My January weaving project was this scarf in Deflected Double Weave. It is my interpretation of Melon-Colored Baby by Elisabeth Hill of plainweave on Etsy.
I used 2/10 merino/tencel again for this project, this time changing the sett from 20 epi in my previous project to 16 epi. Here it is on the loom.

I find that 16 epi is probably too lacy and next time I will probably increase the sett back up a bit to 18 epi.

Also, the floats on the sides are waaaaaaay to long, probably due to my unsure selvedge management. I may be tinkering with the draft a bit on each side in hopes of making that part of the weaving a little easier.
I’ve been looking for DDW drafts here, there and everywhere, and I found some nice ones in the book published by Complex Weavers, Eight Shafts: Beyond the Beginning. One of the projects in there recommended adding shafts (if available) on each side threaded in a straight draw. This would add some stability, even if some shuttles are not taken all the way to the edge.
Meanwhile, I going to weave up a couple of rayon chenille scarves to clear my head.
Cheers!
This is just a quick post to announce that I have received my first ever donation on this blog! I appreciate all those who follow my blog. The donate button is at the top of the page, and if you have ever received a free weaving file from me, please consider adding something to the tip jar.
Cheers!
A few end of the year items. I finished an awesome mosaic stitch sweater.

This is the Faro Pullover by Nomad Stitches. You can find it on Ravelry. I continue to be fascinated by mosaic stitch and wish there were more knitting patterns available for sweaters in this stitch. This is knitted in the round, and all of the charted pattern rows are knitted twice. You slip pattern stitches with the working yarn in back.
Speaking of mosaic stitch, I also knitted a Knit Hello Season’s Greetings. This image is from Ravelry where you can also find the pattern by Rüdiger Schlömer. This version of mosaic is knitted in garter stitch. When slipping pattern stitches, the working yarn is in back on the first row and in front on the second row.

I continued work with Deflected Double Weave. As promised, I wove another pattern by Janet Phillips from her book Exploring Woven Fabrics.


I happened to have a lot of 5/2 mercerized cotton in these mid-century modern colors, so I went for it. These mats were sett 16 epi, and I had a good time weaving them. Although, the color placement for the blocks could have been better, and for some reason the first one turned out shorter than the rest.
Next up, a Deflected Double Weave pattern by Elisabeth Hill, Owner of plainweave, Melon-Colored Baby. Find that one on Etsy. I’m doing this one with 2/10 Merino Tencel in warp and weft, this time with a sett of 16 epi.
***************************************************************************
Feedback Form
This week, November 24 – December 2, you can take advantage of a 25% off sale in my entire shop! Find the Etsy button on the right side of my blog page, and click over to see what’s on sale!
Or just click here: https://iowaweaver.etsy.com
Cheers!

I starting planning this project in July, I think. This is 6 harness Deflected Double Weave in the pattern Deflect Circles by Janet Phillips. I found it in the first issue of Weft Magazine (highly recommend!), and thought to myself that I should finally try this technique.
The warp and weft I chose for this project is 2/10 Merino/Tencel from WEBS. I had enough of this yarn from previous projects. (Unfortunately, this yarn is completely out of stock now, and my hopes are dimming of there being any more in the future. Shame. It is a fabulous yarn.)
Weaving went well. At this point what I expected would turn into circles (eventually) were merely lacy looking rectangles. I hemstitched at the start and at the end, leaving about 3 inches of fringe hanging loose (a mistake). Also, I had a few missteps at the beginning with the selvedge. Apparently, most everybody does, when they first try this weave structure. I left my mistakes as is and quickly changed tack, after referring to this video by Elisabeth Hill.
I have some back issues when weaving, and usually can only do about an hour per day, so it went at a leisurely pace :-). When I took the piece off the loom, I gave it a 5 minute wash by hand in a tub, moving it around vigorously, a technique I gleaned from yet another video. By observing how it was transforming right in my hands (!) I stopped when the “rectangles” became “ovals”.
After giving the scarf a spin in the washer, I hung it over a rack to dry. The result is luxuriously soft and squishy, and I am smitten.


What I learned:
Next up will be another Janet Phillips Deflected Doubleweave design, Cosmopolitan Cobblestones.
*************************************************************************
Feedback Form

Subscribe to get access to the rest of this post and other subscriber-only content.
The summer has been a series of random projects, doing what amuses me, instead of trying too hard to feed the Etsy shop. Below, you will find my Mosaic Knitting Sampler. It seems that mosaic knitting is where it’s at, for the present at least. These designs are taken from Barbara G. Walker’s book Mosaic Knitting. I used two colors of Berrocco Ultra Alpaca, and just kept knitting until the piece got really out of hand. After I washed and dried it, I had to lay it out on the floor to photograph, and only then could I shoot it in sections. Don’t have a clue what I will do with it. It is much too long for a scarf. Ideas?


On the sewing front, I made this jeans jacket style jacket from some cotton/linen fabric I picked up about 3 years ago. I took the picture before I had buttons to put on it. Now, I do, and it’s all done. Many mistakes were made, but it still looks fine!

As for weaving, I wove two chenille scarfs using my new colorway Sand Dunes.

As is my habit, I supplemented the space dyed yarn with solid colors: light blue, azure blue, and camel. Look for these in my Etsy shop soon!


I am putting a new warp on the Ashford loom now, a 6 harness Deflected Double Weave design I found in the first issue of Weft Magazine by Janet Phillips. This is strictly a learning experience, my first time around with this technique. No pictures yet. Hoping for the best!
Now in my Etsy Shop! 25% off all my scarfs through the month of August! Please visit!

